How To Install Graphic Safety Strip
Need to put some safety visibility strip on your glass windows and doors and not sure how?
Applying this product to your door or window glazing is quite simple, and there are two easy methods that can be used depending on your level of confidence.
Wet hinge application is recommended for those who are not as confident and would like to be able to re-position the strip if something doesn’t go 100% correctly.
Dry hinge application requires less steps, but is less forgiving and can wrong if not done properly.
Please Note:
These instructions are for our graphic visibility strips, including the Geometrix and Simple Ranges.
For instructions on how to install basic plain band safety strips which are supplied without application tape on them, please navigate to the How To Install Safety Strip page found here.
What you'll need:
-
A sharp knife (a craft blade or Stanley knife with a sharp blade will do)
-
A vinyl applicator (if not available, a window squeegee will do too, or they can be purchased from our store here. Some people also use flexible plastic cards like a credit card, however the amount of pressure required to applicate the vinyl to the glass can snap the card and we do not recommend this)
-
Windex or other similar window cleaning product
-
Spray bottle with mixture of warm water and detergent / baby shampoo at a ratio of 1 gentle squeeze per 100ml of water
-
Masking tape (if you've purchased a safety strip from our store, 4 pieces of tape have been provided for you per strip)
-
Measuring tape
Reference Diagram:
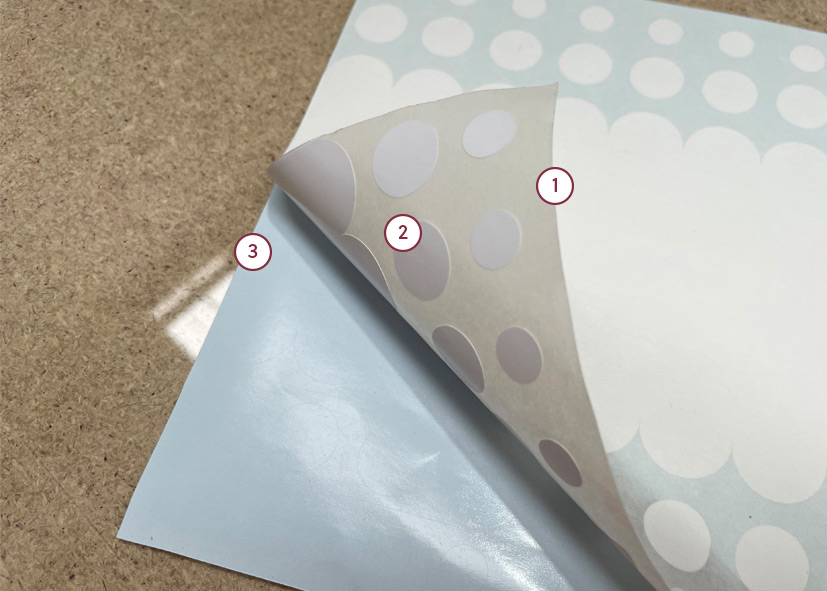 |
1) Application Tape Sticky, adhesive-covered sheet that allows you to install your new safety strip in one piece 2) Vinyl Safety Strip Machine-cut self-adhesive vinyl strip in your selected design 3) Wax Paper Wax-coated backing paper attached to the self-adhesive vinyl |
Wet Hinge Application Installation Steps
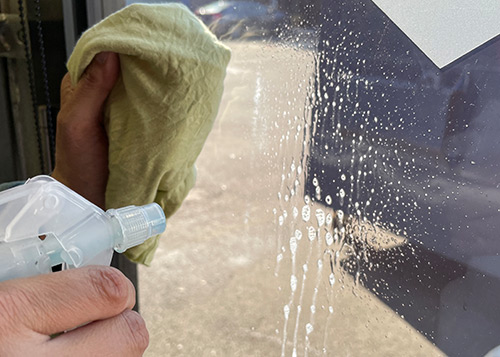 |
Step 1:Clean the glass where you want to apply your safety strip using the Windex. Make sure that any foreign objects like small dots of paint are scratched off, as these will affect the appearance of the surface of the vinyl. If you have a tint on the internal side of your glass, you will want to apply the strip to the external side of the glass both for visibility of the strip and so that you do not damage the tint when trimming the strip back to the edges. |
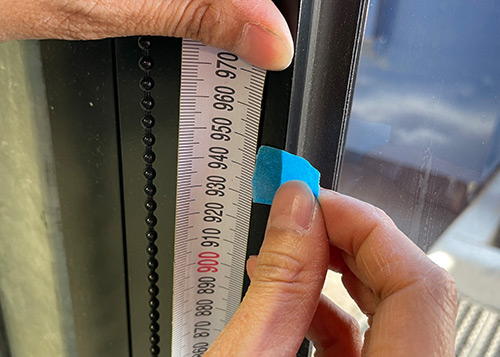 |
Step 2:Use your measuring tape to find the desired height of the decal from the floor, and mark this location on both left and right sides of the glass using the supplied masking tape. Remember that the lower edge of the strip must be located between 900mm and 1000mm from the floor. |
 |
Step 3:Align your strip to the masking tape marks, ensuring that there is sufficient excess strip overhanging on both sides. This will be trimmed back later. Tape the strip securely in position using masking tape at the centre of the strip. |
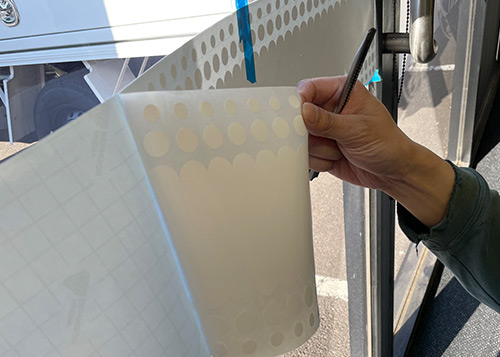 |
Step 4:Gently fold back one side of the strip to the centre ‘hinge’ and peel the section of wax paper backing off the vinyl decal / sticky application tape. If the vinyl wants to stay attached to the wax paper, apply pressure to the application tape to re-adhere it to the back of the vinyl decal. |
 |
Step 5:Carefully cut this section of wax paper backing away with a sharp knife. |
 |
Step 6:
Liberally spray your mixture of warm water and detergent / baby shampoo on to the sticky adhesive side of the vinyl decal. This will allow you to reposition the decal on the glass if needed before it permanently adheres. |
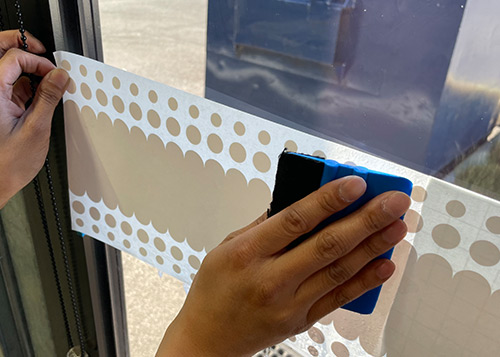 |
Step 7:Align the now-soapy strip back to your masking tape alignment mark, keeping hold of the edge with just enough pressure on it to make sure the strip is taut. If the adhesive touches the glass accidentally, the soapy water will prevent it from sticking in the wrong position. Using the hard side of your vinyl applicator (or squeegee), start from the middle and work your way out to the edges to press the strip on to the glass with long, sweeping motions on a 45 degree angle. |
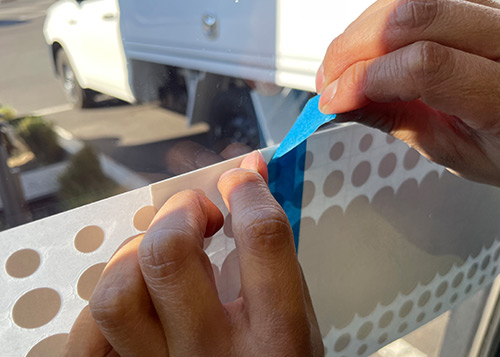 |
Step 8:Once you have this half of the strip firmly in place, you can remove the masking tape ‘hinge’ from the centre. |
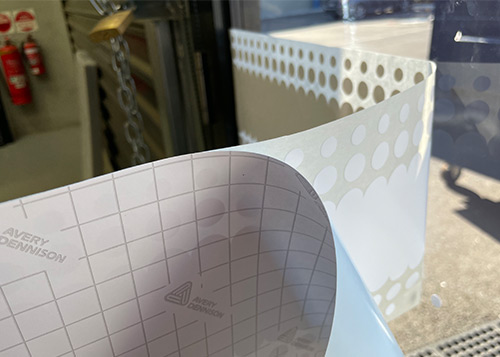 |
Step 9:Carefully peel away the remaining wax paper, and spray your mixture of warm water and detergent / baby shampoo to the sticky adhesive side of the other half of the decal. Repeat the same process to adhere the remaining half of the decal. Run the applicator / squeegee firmly over the entire strip again to ensure that all soapy water and air bubbles have been pressed out from behind the vinyl. |
 |
Step 10:Wait until the soapy water has dried completely, then remove the application tape. Depending on the current weather conditions, it can take anywhere from 15-30 minutes, to overnight. Do not try to remove the application tape until this is completely dry, as the vinyl will come away from the glass if there is any moisture or detergent remaining on the adhesive, and you will have to re-applicate the vinyl to the glass. |
 |
Step 11:Once the application tape has been removed, trim away the excess vinyl on both sides of the glass using a sharp blade. Peel the excess off and discard it. If you find any bubbles of soap or air, these can be gently pressed out toward the closest edge. If the bubble doesn’t want to move, it can be popped using the tip of a sharp knife, then the soap or air can be pressed out via the hole. Clean the soapy residue off the glass using Windex or another glass cleaning product and you’re done! |
Dry Hinge Application Installation Steps
The dry hinge method is almost the same as the wet hinge method, however you do not use warm soapy water. This means that you can peel and trim the decal as soon as you have finished applicating it as there is no dry time, but if the adhesive side of the decal touches the glass, it will instantly ‘grab’ and you cannot reposition it.
The same installation how-to pictures can be referred to from the wet install method (ignoring the images for the spraying of the soapy water of course)
Step 1:
Clean the glass where you want to apply your safety strip using the Windex.
Make sure that any foreign objects like small dots of paint are scratched off, as these will affect the appearance of the surface of the vinyl.
If you have a tint on the internal side of your glass, you will want to apply the strip to the external side of the glass both for visibility of the strip and so that you do not damage the tint when trimming the strip back to the edges.
Step 2:
Use your measuring tape to find the desired height of the decal from the floor, and mark this location on both left and right sides of the glass using the supplied masking tape.
Remember that the lower edge of the strip must be located between 900mm and 1000mm from the floor.
Step 3:
Align your strip to the masking tape marks, ensuring that there is sufficient excess strip overhanging on both sides. This will be trimmed back later. Tape the strip securely in position using masking tape at the centre of the strip.
Step 4:
Gently fold back one side of the strip to the centre ‘hinge’ and peel the section of wax paper backing off the vinyl decal / sticky application tape.
Step 5:
Carefully cut this section of wax paper backing away with a sharp knife.
Step 6:
Keeping hold of the edge of the application tape with just enough pressure on it to make sure the strip is taut, align the strip back to your masking tape mark.If the adhesive touches the glass accidentally, it will grab and stick to the glass so make sure you hold it taut enough that it will not touch the glass.
Using the hard side of your vinyl applicator (or squeegee), start from the middle and work your way out to the edges to press the strip on to the glass with long, sweeping motions on a 45 degree angle.
Step 7:
Once you have this half of the strip firmly in place, you can remove the masking tape ‘hinge’ from the centre.
Step 8:
Carefully peel away the remaining wax paper and discard it, holding the edge of the application tape with enough pressure to keep it taut and away from the glass.
Repeat the same process to adhere the remaining half of the decal.
Run the applicator / squeegee firmly over the entire strip multiple times to ensure that all air bubbles have been pressed out.
Step 9:
Carefully remove the application tape.
If you find any bubbles, these can be gently pressed out toward the closest edge using your applicator / squeegee or a finger. If the bubble doesn’t want to move, it can be popped using the tip of a sharp knife, then the air can be pressed out via the hole.
Once the application tape has been removed, trim away the excess vinyl on both sides of the glass using a sharp blade. Peel the excess off and discard it.
You have now finished installation of your safety strip!
