How to Install Braille Signs
Need help with correctly installing braille signs to the correct position required by the BCA / NCC?
Installing your new braille sign is very simple. They come standard with industrial-strength double sided tape pre-applied to the rear for you (unless you have requested them to be tapeless), so all you really need to do is ensure you have it correctly positioned and then stick it on!
The trickiest part of a braille sign installation is ensuring that the positioning meets the requirements of the building code. There are quite specific rules that outline braille sign install requirements to maximise legibility for a visually-impaired viewer. Getting this placement right is about so much more than just meeting your compliance responsibilities; it’s also about accessibility.
Positioning a Braille Sign
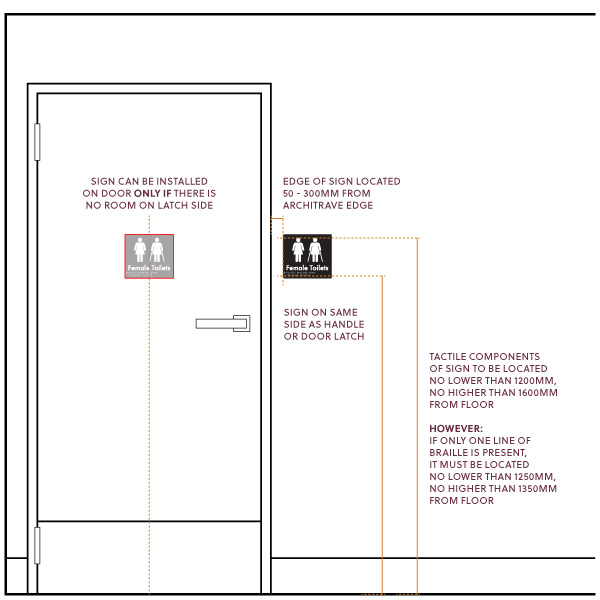
The required height of the braille sign is based on the location of the braille and tactile components of the sign, not the panel that they’re located on, though it’s easiest to measure to the base of the sign itself.
The braille and tactile components must be no lower than 1200mm and no higher than 1600mm from the floor level.
If the sign only has single lines of tactile characters, these must be located no lower than 1250mm and no higher than 1350mm from the floor level.
The sign must be located on the latch side of the door (not the hinge side), and needs to be between 50mm and 300mm from the edge of the door’s architrave.
If there’s no room on the wall to position the braille sign within these rules, it can be placed centred on the door instead. This is something you’ll commonly see on ambulant cubicle doors that are located within a toilet block, as these usually do not have any wall space but still require a braille sign to indicate the ambulant cubicle.
If you’re installing an ‘Exit Level x’ sign, the sign should be applied on the side of the wall that a viewer would be facing if they were trying to leave the area to exit the building.

Installing the Braille Sign
What you’ll need:
- Masking tape
- A marker or pencil
- A measuring tape
Now that you know where you need to position the sign, the next step is to install it.
Take a piece of masking tape that extends longer than the width of your sign by roughly the distance that you want to sit from the architrave. Using the measuring tape, stick the masking tape on the wall/door at the desired height that you just measured out.
Make sure that the piece of tape is straight and level by double checking the height at both ends, as this is going to be your placement guide for the sign itself. Once the sign is on the wall, there is little chance to reposition it due to the strength of the tape’s adhesive, so it’s much safer to double check your height sooner rather than later.
If you’re finding that 1 long piece of masking tape is too awkward to position, you can also measure and apply 2 smaller separate pieces as long as they are positioned in such a way that there is a tape marking for each end of your sign.
Next, measure the distance you want the sign to sit from the door architrave and mark it on your piece of tape using the pencil or marker. If your sign is being positioned centred on the door itself, you’ll want to mark the centre point of the door itself, and the centre point on the sign (again using tape to avoid leaving permanent marks).
You can now remove the protective layer from the back of the tape. It is a good idea to only peel part of the tape back, leaving the protective plastic overhanging the edges of the sign, only peeling the backings off completely when you’ve positioned and stuck down the first part of the tape to the wall. This will allow you a little more leeway when trying to align your sign to the masking tape marks as less adhesive is exposed.
WARNING:
You will need to take care once the protective plastic has been removed from the tape as it is extremely high tack and will ‘grab’ the wall as soon as it touches, making it very hard to reposition the sign once stuck. If you accidentally attach the sign in the wrong position, removing it has an extremely high chance to damage or remove paint from your wall. There is no easy way to do this on a painted plaster wall, and the longer you leave it the harder it sticks.
